What
Do I Do Next in Avernum: Escape From the Pit
Stuck? Frustrated?
Getting killed everywhere you go? There is help.
Simply click
on the link that corresponds to your level, and scan the list for
quests and/or fights that you haven't done yet. Then scroll up to the
previous lists; you never know, you might have missed something juicy!
You should find enough to get you to the next level, opening up a whole
new world of possibilities! (You can skip
all the boring
stuff below)
This is a not a
step-by-step walkthrough. It's basically just a list of
quests and combats, broken down by the approximate level you should be
to beat them — on Torment. On normal, you can generally skip ahead at least a couple
of levels. You do not
have to do them in the order given. The
purpose is to show a player how to get to the next level, if they feel
unable to progress. The list goes up to level 14, at which point
your options are wide
open. If you find that you can't handle a fight at the
recommended level, you have several options:
- Come back later. In most cases, there is enough XP
available to level you up even if you skip a fight or two. There are
many quests that require no combat at all.
- Change your tactics. You can find a few suggestions here. For more
comprehensive information, look here.
- Examine
your character builds, and adjust as necessary. Spreading skill points
far and wide is generally a mistake, and you should concentrate most of
your
stat points in your main offensive stat: Strength for warriors, Dex
for archers, and Intelligence for casters. If you keep getting killed
in one shot, add more Endurance. Look here for a
general description of the builds I used, and here for a different (and much more detailed) perspective.
- Turn down the difficulty. This guide was tested on the
highest
difficulty so it would work for everyone, but you should play wherever
you get the most enjoyment. It's called Torment for a reason!
The best XP comes from
quests, but I will also be pointing out optional combat
opportunities, and assuming that you are taking on all wandering
monster encounters that you reasonably can. I am also assuming that
you're scouring each town and dungeon for loot and improving your
equipment and spells as you go, and that you're picking all pickable
locks (for
the XP if nothing else). I will not be dictating to you exactly how to
spend
every coin and skill point, though I will drop a
suggestion here and there. Nor will I be taking all the fun out of
exploration by telling you exactly where everything is - you can find
maps and more info here
and here.
Despite a few bottlenecks, there's
always more than one way to get where you're going.
Go ahead and collect all
quests as you come to them, including job board items. I will only be
mentioning them as you can complete them, however.
Quests will appear
in bold face, followed by the location and name of the quest-giver.
Non-quest fights will appear in regular type, followed by
their location if that's not obvious. Either may be followed by
comments on tactics or
difficulty. Asides and suggestions will appear occasionally in italics.
This
is based on a play-through that I did on Torment. In many
cases, I'll be advising you to do part of a dungeon and come
back at a higher level to finish it, but that will not necessarily be
required if you're playing on lower difficulties. For
example, on Normal I was able to do the whole bat cave the first time I
encountered it — at level 3!
My party consisted of a
dual-wielding warrior, an archer, a mage and a priest. Fair warning:
Archers are sub-optimal, because they don't keep up with
damage output later in the game, and evasion is not supposed to be an
effective
long-term survival strategy. Knowing this, I used one anyway because I
like archers and they suit my play style. In fact I found that evasion is
a pretty good survival strategy, except against bosses. And the archer,
acting first, can usually place herself so as to harmlessly draw mob
attacks that would otherwise be chipping away at the tank's health.
It's still not as effective as mowing them down with two dual-wielders,
but you can beat the game with all kinds of parties.
This
is not a min-maxing guide - I find that sort of thing boring and
unnecessary, so
power-gamers will be disappointed here. For example, I will use a few
more skill points than I strictly have to, rather than doing
things wildly out of order just to get to a trainer early — or struggle
through half the game waiting for the cheapest trainer. But I do pick
up quest items I know I'll need later, just to
save retracing my steps.
My builds were
straightforward: Each PC invested in its primary stat (STR for the
fighter, DEX for the archer, INT for the casters), plus the occasional
point in Endurance. Each raised its primary attack skill each level,
with the warrior alternating between Hardiness and Parry, and the
archer alternating between Sharpshooter and Lethal Blow. Casters invested
a few points in Tool Use, and otherwise raised Spellcraft and Resistance
besides their primary. Tool use (including the Nimble Fingers trait, if
taken) of at least 5 will get
you a very good bow in Ft. Avernum, and a little more doesn't hurt.
Traits were
mostly core stats and Endurance, with a couple of Nimble Fingers. At
level 8, everyone took Negotiator, and at 12, everyone got Sage Lore.
Once the fighters had Adrenaline Rush, they branched out a bit.
Another
approach for the archer would be to raise Bows to 10 (or even 8 and buy
two levels if that's your thing), then start raising either Melee or Pole weapons and
Hardiness to 10 before going back to missile skills. As long as you keep raising Dex, this shouldn't have
too much of an impact on accuracy; what it will do is give her a better
shot at surviving when she does occasionally get hit. Eventually, you might even want to give her some Parry. On Normal, that
might be a waste of skill points, but on Torment it's not a bad
investment.
Note
that these are not necessarily the best or the only
possible builds — two warriors will do a lot
of damage once they start to hit reliably; you just need to change your
tactics a little. If you hate backtracking, there's no reason you can't
throw a few points into Cave Lore as you go along. Likewise, if you
plan to go for Magical Efficiency eventually, there's no reason not to
start raising Arcane Lore fairly early — in fact it will give you access
to some of the spell tomes earlier than waiting for the Sage Lore
trait. Min-maxers may deride some of these ideas, but you may find that by the
time your party's level is in the high twenties, your casters in
particular are running out of useful places to put their skill
points anyway.
So basically, do whatever you want, within reason. But if
you're playing with some exotic party (no casters, or singleton,
or something), then obviously this guide may not exactly apply. If
you're a better player than me (not unlikely), my advice may seem
overly
cautious. I don't claim to be an expert, but the point is that
you don't have to be an expert to beat the game, even on Torment — you
just have to be persistent, and willing to try different things and
learn from your mistakes.
The argument has been
made that you should hoard all of your saleable loot until
level 8, when
the
Negotiator trait kicks in. This is a good strategy if you can manage
it, because money is tight in this game. You should not need to spend
gold on consumables or equipment in the early game, and your starting
spells will carry you through level 5 or so. By the time I got to Ft.
Dranlon, I had over 2100c just from drops and quest rewards, which was
enough for a level each of Bolt of Fire, Daze, Haste, Icy Rain, Minor
Heal, Call the Storm, and Summon Shade. All without selling a single
item.
A Few Words About
Tactics
In
general, don't rush into melee. Let your enemies come to you, ideally
just one or two at a time if you can manage it. Take advantage of
terrain like doorways and narrow corridors — you don't have to make it
easy for them. Sometimes you can lure ranged fighters (even casters!)
right to you by stepping just out of sight.
Your Protection
spell is extremely valuable; you should cast it before every fight, and
renew as needed. Same with Haste, when you get it. War Blessing is just
okay for buffing purposes, but it's invaluable for canceling out
curses.
When I suggest "going in prepared", that means buffed and in combat
mode. Opening doors in combat mode can win you a whole free round
against enemies that otherwise attack before you (If one
of your PCs is faster, have that one skip her turn). You can also
search containers in combat mode, and thereby gain an advantage in
certain spawned encounters.
Steelward and Spellward scrolls will
be crucial to get you through certain fights, so use them
wisely until you have access to the spells. When you run low on spell
points, retreat and recharge in a town if possible, to conserve energy
potions. You may need to make numerous trips to clear difficult
dungeons.
Pets are
useful on Torment, not so much for inflicting damage, but for running
interference. Shades are immune
to mental effects like Daze (and incidentally to poison and cold
attacks too), so they're good at helping to block doorways. (Edit: In a
subsequent play-through with 3 casters and a dual-wielder, I'm finding
that my summon-specialist mage's pets are extremely useful — in the early-midgame they usually have a better to-hit chance than my warrior. They kind of kick ass.)
Speaking of Daze, you
should make good use of it. In the very early game, it's reasonably
effective at crowd control. It isn't long before most enemies are
resisting it, but by then you should have it at level 2, which adds the
Ensnare effect — very
nice. It will save your life when you're faced
with hard-hitting melee attackers. Ensnare even works against creatures
that
are naturally immune to Daze, so go ahead and cast it on undead to slow
them down.
A favorite trick of mine
for a tough early-game (say, level 6 to 12) fight is to park my archer
just outside a
doorway and let a low-level minion get between her and the boss,
especially if the boss has a mean melee attack. The minion will likely
have a very low chance of hitting her at all. Then I summon a shade,
which will help to block the door, while distracting the minion and
also doing a little damage (not too much, we don't want it to die
prematurely). That way, even if my archer gets stunned or dazed, the
minion will stay put. Meanwhile, she fires at the boss
with support from the other PCs as needed. If the boss has a serious
area attack (which most of them do), the rest of them spread out,
getting right out of sight if necessary. Icy Rain can be deployed from
just out of line-of-sight if need be. As long as the boss can't
actually one-shot the archer, this method is slow but sure. The warrior
is pretty much dead weight in this scenario until mopping up. You do not want him engaging the minion in the doorway
until the boss is dead! Once you get Group Heal and Mass Cure, and
better resistances and armor, you can adjust your tactics accordingly.
Bait & Switch is another trick that works especially well for parties without
an archer. Let's say you have two warriors and two casters, and you're
about to enter a room with a nasty boss and a bunch of minions. Go into
combat mode and position one warrior on each side of the doorway, and
the casters a little off to the sides:
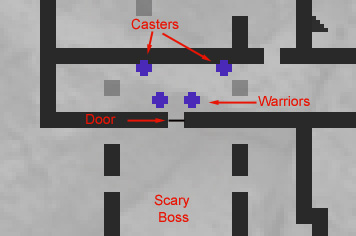
The
intention is to keep everyone out of direct line-of-sight of ranged
attackers. When ready, warrior #1 opens the door, steps onto
the threshold, and either fires off an arrow or uses a wand — the point
is just to get their attention (if he can't reach a target without
moving farther into the room, don't do it; see plan B).
Now warrior #1 is standing in the doorway, and warrior #2 is still
standing just to the side of it. On #2's turn, he steps into the
doorway, swapping places with #1, and then steps back out on the other
side. So they're back in their original positions, except swapped. Now
the critters in the room will start to come through the doorway one or
two at a time, including ranged attackers that normally would not
come near your fighters. This set-up also protects you from cleaving
attacks, and lets you back-stab if you have that trait. Obviously, some
ranged attackers may find a suitable angle from which to get at you
within the room, but a surprising proportion of them will just join the
conga line of death.
Plan B: If the warrior can't reach a target
from the doorway, just have him step back to his original position.
Your mage (or priest) can then target any space the fighter saw from the doorway with
an AoE spell like Icy Rain (or even Daze). They can do this without
moving. Any mapped space
can be targeted by a circular AoE spell, even if it's not in
line-of-sight — as long as no-one in your party can see a creature on it.
Seriously, it's okay if there is a creature there, as long as you can't see it. (This is a bit of an exploit, but hey, all's fair on Torment.) Anyway, that will provoke them into coming out.
If you've gotten the
impression that it's often a good idea to limit melee on Torment,
you're correct — at least in the early game, against enemies that are
stronger than you, which is a lot of them. They will hit you hard, and
you will in many cases hardly be able to hit them at all. And getting
mobbed is never a good thing, at any stage of the game. Later on your
warrior will come into his own, but he's going to need more
Strength and skill before he can hit high-level foes reliably. Better
armor along with
more Endurance, Hardiness and Parry will also help with the not dying.
Speaking of which, don't
bother with any armor pieces that have a to-hit penalty attached,
except for chest armor, and shields for the archer and the priest.
Helmets, bracers, belts and greaves with hit penalties are just not
worth it unless they come with substantial magical bonuses. Note that
items with to-hit bonuses
(such as many bows have) will offset those penalties, allowing your
mage to wear heavier armor.
Oh yeah, and save often.
(Questions and comments can be posted to this thread on the Spiderweb Software forums.)
Level
One
Escape the Arrival Caves
(Tutorial cave) - Offer to
help Brissa and don't forget to go back and tell her that Lagran is
gone. Wait around until all of the refugees leave. By then, you should
be level 2. Note that if you actually manage to kill Lagran (not easy
to do in any case), you will miss out on a huge chunk of XP, so heroic
measures are not recommended.
Start
picking up bars of iron and sacks of meal. You will also need 3 each of
picks, shovels, hammers, tongs and pincers, so keep your eyes peeled as
you go along. And save herbs, though you can use some for potions. For
a complete list of collection quest items, look here.
Level Two
There's
way more than enough here to get you to level three, so if something
seems too hard, you can come back to it later. You don't have to do
these in any particular order.
Finish
clearing the tutorial cave if you haven't already, then go upstairs to
Ft. Avernum.
Be
sure to grab and keep the bag of sugar from the unlocked store room for
an easy quest later. And don't miss the chainmail vest hiding in the
corner of the eastern store room — it may save your life.
Meet Silvar's Mayor (Ft.
Avernum, scout) - This is the first step in one of the major game-winning quests, but you get no XP for it.
Find Anastasia
(Ft.
Avernum, Warrick) - An easy jaunt over to Silvar and back to fulfill
this one.
Giant rats (Ft.
Avernum)
- Just outside the walls to the southeast.
Goblin camp (outdoor
encounter, north of Ft. Avernum, east of Ft. Duvno, near the cave wall)
- Should give you no difficulty, with Daze.
When
you get to Silvar, don't buy a boat there; you can get one cheaper in
Cotra, and you don't need one yet anyway.
Generally I avoid
visible theft even though you can get away with a few, but I do like to liberate
a steel breastplate from Anastasia's shop — it's the best armor you'll
see for quite some time. You can also steal an iron breastplate from
Jasmine's shop in Formello without consequence, since she is a neutral
character — NPCs whose names appear in blue don't notice when you
commit crimes.
Hidden goblins (Silvar)
- Behind Carol's bakery. These guys are fairly easy if you go in
prepared, potentially deadly if you don't.
Message to Ft. Duvno
(Silvar, job board)
Bat Swarms
(Silvar,
job board) - If you're playing on Torment, do not attempt to go deeper
into the cave after you kill the bats. The rats will devour you at this
level.
When
you get to Ft. Duvno, do not buy spells there; you will get them
cheaper very soon in Ft. Dranlon.
Brigand Extortion
(Ft. Duvno, Jason) - It may take a couple of tries and/or
require the
use of a couple of items, but it is doable at this level. Make sure you
avoid the nearby lone slith for now.
Bandit ambush
(Outdoor
Encounter, abandoned house near goblin cave) - Just be very careful to
avoid the lone slith wandering nearby.
Bandit ambush
(Outdoor Encounter, hidden campsite in north cave wall)
You will almost
certainly be level three if you've done most of the above, but the
following can also technically be done at level two (or you can wait to
go to Cotra until you've done the Silvar and Ft. Duvno quests):
Message to Ft. Dranlon
(Cotra, job board)
Cheap spell levels are
available at Ft. Dranlon, but you can get by
with your starting spells for the next few levels. You won't have much
cash yet at this point anyway.
Nephilim Encampment
(Cotra, job board) - You can easily do this now for a very nice chunk
of XP, if you choose the
"Warn them to leave" option. Killing them later will actually net you
less XP.
Delivery: Formello
(Cotra, job board) - Make sure you go downstairs and collect the
package before you leave town.
Level Three
Giant
Lizards (Outdoor Encounter, watering hole) - A bit tricky but doable if
you have the iron breastplate and chainmail vest on your fighters, and if
you can get the lizards to split their targets on the first round. If
you
don't have a high-Dex character, you probably want to leave this one
for another level or two, depending on armor.
Lone slith (Outdoor
Encounter, wanders near the goblin cave) - Doable if you have enough
health and armor to survive the first strike (or get lucky with a
parry),
but will be hard to hit.
Giant spiders
(Outdoor Encounter, north of Cotra)
Silvar sewers (the
level, not the quest) - Most of the level can be
cleared if you proceed with caution. In fact, the Droknarr (boss) fight
can be done at this level, but I don't recommend it on Torment — it
will burn a lot of resources. It's pretty easy to get to level 4 first,
so just come back a little later.
Goblin cave
(northern cave wall) - This is the location of the Nephilim
Problem quest, and again you can clear most of the dungeon at level 3.
You will almost certainly level up before reaching the boss fight, but
if not, go do something else and come back at level 4.
Bandit
fort (west of Ft. Duvno) - This is the location of the Bandit
Irritation and Misplaced Knowledge quests, and once again you probably
can't finish them yet, but if you just need some extra XP to get to the
next level, you can clear most of the map. Avoid the center-west room
and the one immediately south of it. Probably best to avoid the Fierce
Rat outside the north wall, too.
Level Four
Nephilim Problem
(Ft. Duvno, Captain Johnson) - Go in prepared, and your warrior should
be able to close with Dorva. Keep the nephilim Dazed as much as
possible while you whittle him down.* Afterward, be sure to free Hinthek
(in the cells) for some extra XP and rep.
*Alternately,
you could exploit the neutral NPC bug: Stand by the wall and snipe all
of the nephilim to death before attacking the goblin shaman. Nobody
will react.
Silvar Sewer Worms!
(Silvar, Mayor Jonathan) - Use Daze and/or a pet and/or the archer to slow the flow of
worms into the room. Whichever character can hit Droknarr most reliably
(the archer, in my party) should quaff a speed potion, and you ought to
be able to finish him without using much else besides maybe a healing
or curing potion. Spread your characters out to minimize the effect of
that horrible poison mist.
Bandit Irritation
(Ft. Duvno, Captain Johnson) - Don't be in a hurry to rush into the
room. You may be able to clear out all of the thugs before Perigin
attacks. If not, just Daze them until you've dealt with him.
Fierce Rat (Brigand
fort, outside north wall)
Misplaced Knowledge
(Silvar, job board) - The bandit is your only real obstacle. Keep your
Protection in place and you should be okay.
Even
if you haven't been to Cotra
yet, you should be
level 5 after doing the above quests (assuming you've had at least a
couple of random encounters). If not, you've probably missed
something. Go back over the list and do stuff until you are.
This is a good time to go to Ft.
Dranlon and buy spell levels if you haven't already. At the very least
you want Haste and the second level of Daze. Summon Shade and Icy Rain
would be pretty sweet too, if you can afford them, and you can bump
Minor Heal to level 2 for just 120c — worth it. I tend to keep coming
back until I have almost everything at level 2 except Call Beast and
Cloak of Curses.
Level Five
Nepharim Prisoners
(Cotra, Mayor Steele) - The only serious obstacle is the Vapor Rat. It
might take a couple of tries, and require the use of some Group Heal
scrolls. Avoid being seen by the nepharim at all costs! After the
prisoners are free, be sure to tell Rinn (hiding in the eastern tunnel)
about it for some extra XP and rep.
Fierce rats, etc.
(Bat cave) - By now you should
also be able to clear out the rats in the next chamber of the bat cave,
as long as you take them slowly. You can try going (very cautiously)
down the eastern tunnel. A couple of real nasties down there, but you
may be able to handle them.
If you're not level 6
after all that, you should be very close. Time to head up to Formello
for some easy XP to get you there.
Formello's Mayor
(Silvar, Mayor
Jonathan) - You can do this quest any time after you get it. I usually
wait
until I've done everything I can do in the Eastern Gallery. You
actually get no XP for this, but it's part of the main quest line.
Sugar
(Formello, Gad) - You still have it, right?
Mushroom Meal
(Formello, Jen) - A collection quest.
Bounty - Rat Nest
(Formello, job board) - Another vapor rat. Should be old hat by now.
The Wisdom of Motrax
(Formello, Mother Claudette)
Delivery - Motrax
(Formello, job board)
Delivery - Ft. Draco
(Formello, job board)
Hot Springs
(Silvar,
Gary) - In theory you could have done this much earlier, but for some
reason you get no XP for
it, just the coins, so meh.
You
will certainly be level 6 long before completing all of this, probably
before you even leave Formello. You can buy some Cave Lore from
Vermeers while you're here (rather than spending skill points on it),
but if you do, you probably won't be able to afford all the spells you
want. Cave Lore is a worthwhile
skill, but I recommend holding off spending money on it for a while. Of
course, nothing stops you from spending skill points on it if you want
to.
Level Six
Rats again (Bat Cave) - You can go down the eastern tunnel now, if you
haven't
already. You shouldn't need to use more than a potion or two.
Smoldering
Bats (Bat Cave) - You may prefer to wait on this until you can finish
the whole dungeon, but it is possible to do the bats now. It will
require the use of a Spellward scroll, and it would be best if you top
up your spell levels first. Icy Rain, Call the Storm, and Summon Shade
will be very useful. Leave the last section of the cave alone for now.
Hidden lizards
(Outdoor encounter, North of Formello)
Lizards
(Outdoor Encounter, river inlet south of Ft. Draco) - You need to get a
boat in Ft. Draco to do this one. You want a boat anyway, so you can
get to the spring that gives you Cloak of the Arcane.
In
Ft. Draco, you should be able to find the last few bits of shovels and
tongs and whatnot, so you can swing back down to Silvar and turn in
Efram's three quests in quick succession. Also, be sure to visit
Boutell's forge to get a look at the giant anvil — you'll save yourself
a trip later. On your way down the river, stop and explore the area
southwest of the bend. Check out an abandoned house for a recipe you'll
want later.
Picks & Shovels
(Silvar, job board) - If you were looking sharp and were willing to be
seen stealing one shovel, you could have finished all three of these
before finishing the Ft. Duvno quests, but if not, do them now.
Bars & Hammers
(Silvar, job board)
Tongs & Pincers
(Silvar, job board)
Nephil guards (Outdoor Encounters, near nephil
fortress) - The ones in the front are a little tougher than the ones
guarding the back entrance, but you should be able to handle them all.
Still best to go in the back way, though.
By
now you should be level seven. If not, wander Northern Avernum for a
while — there's no shortage of random encounters in the area.
Level Seven
Nephil
Fortress (west of Formello, south of Ft. Draco) - This is the location
of The Stolen Necklace quest. You will probably need to do it a bit at
a time, retreating to town frequently.
Main
level: Do everything except for the ogres (seriously,
avoid the ogres,
they will
kill you). It is possible to sneak around a bit and avoid the two
mini-bosses on this level (a spiritist and a sub-chief), but that's not
necessary — or if it is, then you're underpowered anyway and won't be
able to finish the quest.
Underground:
Several tough fights here. They're all easily avoided, but we didn't
come here to avoid fights, now did we? Some of them might take a few
tries, but they're all beatable. Darkhaz has brutal attacks that can
kill any character in one round; it's not worth burning a Spellward
scroll, since one of his physical attacks is even worse than his fire.
If you're having no luck with him, he's optional as
long as you picked up the bronze key in the Goblin Cave. Don't forget
to come back later, though, as he's guarding some nice loot.
Upper level:
You can
do everything at level 7 except for the three bosses: Zemera (SE),
Chief Charrar (W), and High Shaman Mrrrrmm (SW). So basically, all of
the nephilim that you can get to without opening any doors, plus the
"honored dead", plus the alchemist, plus the spiritist near the stairs.
Fortunately you will
almost certainly be level 8 before reaching the bosses. If not, go back
over the list and do things you've missed until you are.
Level Eight
If you've been hoarding
all your
loot, it's payoff time. Give everyone the Negotiator trait and go sell your
stuff. Whoo-hoo, money!
The Stolen Necklace
(Formello, Mayor Evelyn) - In fact the only boss you need
to kill for
this is the shaman (in the southwest chamber), but you might as well do
them all. First, make sure you have at least 4 or 5 energy potions;
have Walner at Ft. Duvno make some for you if necessary (but be careful
to save at least one of each type of herb). Then take your
boat over
to the spring to get Cloak of the Arcane (optional but makes your life
easier), and return to the fort.
Use a Steelward scroll for
Charrar; otherwise he will certainly kill you. Spread out, and watch
out for his Cleave. He acts twice per round, so you may have to try
this a few times if you get unlucky. If you keep killing off his pets,
he's likely to waste one of his moves summoning a new one.
You should leave the
Steelward in place for the other two fights; you can survive one of
Mrrrrmm's firebolts without a Spellward, and you can't survive two with
one, so there's really no point. You might as well have the physical
protection from his minions. (Again, this is on Torment, YMMV)
Zemera is the easiest of the three, especially since she starts off
"friendly", meaning you can enter in combat mode and have your warrior(s)
march right up to her while your casters position themselves in the
corners and summon pets.
Mrrrrmm
will likely take several tries no matter what, as he has both a
horrific poison mist attack and a powerful firebolt, and on Torment he
gets to act twice per turn. He can kill any of your characters in one
round if he chooses to attack them twice, so it's imperative to take
him out as quickly as possible. The best way to do that is to bring him
to you, with some variation of the Bait & Switch trick.
Spread
your Return Life scrolls around the
party, and make sure your priest has a speed potion. Casters buff,
heal, and attack when
possible, but stay spread out. Eventually, Mrrrrmm will run through the
doorway, conveniently next to your warrior(s), and far from everyone
else. The priest should take the speed potion at that point in case the
shaman uses his poison mist (he will be able to hit 2 characters at the
most, if you've spread the party out). As with Charrar,
taking out his pet is likely to make him waste an action summoning a
new one — Icy Rain is very
good for this.

On
the next round he hit my fighter twice and killed him. This is almost certain to
happen to someone eventually. If it happens sooner, reload; if later,
use a Return Life scroll.
Afterwards,
destroy the altar — the spawned imps will be trivial compared to what
you just did. Be sure to grab and keep the mandrake root from the
nearby lab when you're done. And check in with Kneedler in the cells
before you go, for some extra XP and rep.
Invading Ogre
(Formello, job board) - You should be able to handle this guy now,
especially if you still have your Steelward in place from the nephil
fortress (but
the ogres in the nephil fort will still kill you*). Avoid the nearby
lava
bats!
*Unless
by chance you've just leveled up to 9 and still have your Steelward in
place, in which case you can probably take the ogre near the trophy
room. Stay away from the ogre mage for now.
Level Nine
Barrow Wight (Bat cave,
past the smoldering bats) - Whatever you do, don't melee anything that has a spine
shield.
If
you've been taking Arcane Lore instead of holding out for Sage Lore,
it's possible that you can read the spell tome for Ward of Steel now.
Which would be awesome, but I'm assuming otherwise in this guide.
Imps (Bat cave,
altar room) - Take the crystals in combat mode, and you
should have no trouble.
Nephar prisoners and
penned lizards (Ft. Draco, cells)
Restless spirit (Ft.
Draco, behind barracks)
Araneas
and Giant Spiders (Outdoor encounter, south of Ft. Draco) - These are
the ones guarding the oozing wand.
Deadly Crypt (Formello,
job board) - You will want to bring a Spellward scroll. If you don't
have a lot of energy potions, that's okay; technically, all you have to
do to fulfill this is
figure
out how to escape from the crypt. For practical purposes, that means
you have to kill all the loose undead in the halls, some of which are
quite nasty. Level 2 Daze will ensnare them, and a summoned shade will
impede them while you shoot and zap. You definitely want
Haste
in your arsenal before you do this, because many of these guys slow you
when they hit. When it's all clear, open the door in the west wall and
proceed from there.
More undead (Ancient
crypt) - You can do
most or all of the rest of the crypt at this level, even if you have to
leave and recharge first — the Spellward will not be strictly
necessary. The Darkling Wight
in the eastern chamber will spam Daze at you; lure him out of the room
so you can all spread out and hit him. Bait & Switch works very nicely here.
Clear the rest of the rooms except possibly for the northern one. Thexa
Blooddrinker, in that one, can
be done at this point, but she may charm one of your fighters, which is
pretty much a disaster unless you have Unshackle Mind. I had
previously posted the speculation that she only used Dominate at
missile range, but this has been proven incorrect. If you're having bad
luck with it (or with her super-nasty lightning attack),
come back later.
Be sure
to talk to Gooley on your way out for some extra XP.
Now, at this point you could
go south to Mertis. But
I like to be as thorough as possible, so...
Nepharim
(Underground fort, north of Cotra) - You don't want to take on too many
nepharim at one time. Start with the secret entrance that leads into
the small room — there's a nice manageable group in there. If you have
no trouble with them, you should be able to do all of the loose
nepharim in the main area, a few at a time. If a bunch of nephar
warriors
come at once, use level 2 Daze and if necessary Call the Storm to keep
them at a distance — their combined melee attacks will kill you. When
the halls are clear, open the rooms by the gates and kill the guards.
Finally, there are two nepharim
visible
through a window in the central chamber — might as well shoot them,
too. By the time you've done all that, you should be level 10. If not,
come back later.
A Tuft of Graymold
(Freehold of Kyass, Kendrew) - You can
do this one now (could have done it anytime after you got your boat in
Cotra, actually), but I strongly recommend that you keep both sprigs of
graymold for other quests, and do this one later. Take your boat west
of Ft. Dranlon, then take the first right and look out for a peninsula
with an herb patch on it. You don't need any Cave Lore for this one,
and just knowing the location of the patch is good for some XP later on.
If
you've been taking Arcane Lore instead of holding out for Sage Lore,
it's possible that you can read the spell tome (in the Freehold) for Ward of Elements now.
Which would be awesome, but I'm assuming otherwise in this guide.
If you're below level 10
when you go to Mertis, you probably want to avoid the group of undead
that roams near the town.
Herbs for Ether
(Mertis, Ether) - If you've harvested the graymold from the patch near
the Freehold, you should be able to do this whole thing.
Vapor rats (Mertis,
silo)
Level Ten
Nepharim,
cont'd (Underground fort, north of Cotra) - It's time to start kicking
in
doors, starting with the rooms around the outside. Go in prepared,
timing it so you get to act before they do. The spiritists have a
nasty habit of summoning pets that are way more powerful than they are.
Twice I was forced to flee the summoned after slaying the summoner.
That's okay, though, the pets are gone when you go back.
The
boss
fight (central room, near the prison cell) is beatable with Steelward
and a speed potion or two, if you have a decent tank (or an archer
tough enough not to get one-shot killed). Otherwise come
back a little later. If you have a high
tolerance for boredom and some excess energy potions, you can
actually kill the boss without opening the door, but I won't get into
the
details.
Taking
the blade from the altar in the shrine will spawn 3 cave demons. DO NOT
attempt to
fight them now. You will lose. If you really want to fight them, you'll
have to come back for the blade much later. If you don't care about fighting
them, but you
really want the Radiant Shortblade (and you do), you can get it the
cheap and dirty way: position the party near the exit, go into combat
mode, and send your squishiest character into the shrine to get the
blade. He or she will be killed in the first round. As soon as that
happens, end combat and simply stroll out. Buh-bye, demons!
(Edit:
In the latest update, this exploit has been nerfed slighty. You may not
be able to take the blade if the rest of the party is right by the
exit; leave them near the gate instead.)
Tunneling mage
(Outdoor Encounter, across the river from Silvar)
Ghast
& ghouls (Outdoor Encounter, wandering near Mertis) - Oddly
enough,
two spells which do no damage to undead (Daze and Call the Storm) are
the key to surviving this encounter. You will probably die unless you can keep
most of them away from you most of the time. In between, keep renewing
Haste and Protection. Picking off the ghouls first will save you some
grief.
If you skipped doing the
Nephar chieftain, you might be just shy of
level 11. It
is possible to do the outer ring of the Spiral Pit at this point, but I
recommend getting more spells first.
This
is a good time to head down to the Tower of Magi if you haven't already — you can learn to use
the pylons and buy a few useful spells. Be sure to avoid the group of
wandering ogres, for now. Once you have Group Heal, Unshackle Mind and
Steelward (among others), you can go back and do anything you missed.
The Largest Anvil
(ToM, Throndell) - You should be able to turn this in instantly, if you
visited the forge in Ft. Draco.
Solberg's Message/Find
Solberg
(ToM, Kelner) - He won't give you this quest unless you've already
heard about the Haakai from someone else. Talk to everyone; it'll come
up eventually. These are necessary to advance one of the major quests;
however you get no XP from them, so no rush.
Nephar guards
(Outdoor Encounters, near Underground Fortress)
Nephilim Raiders
(Cotra, job board) - Steelward turns this from a near-certain defeat to
a near-certain victory.
Level Eleven
From here on I'm
assuming you have at least one level of Steelward.
Nephils'
ogres (Nephil fortress, main level) - There are two of them, the one
guarding the trophy room, and the ogre mage in the small room.
Lurking sliths
(Outdoor Encounter, east of Ft. Dranlon)
Scaly imps (ToM,
restricted area)
Rescue soldiers from
spider attack (Outdoor Encounter, south of Spider
Cave)
Five Aranea (Outdoor
Encounter, south of Spider Cave) - This
might take a few tries, but it is
beatable. Focus fire.
Shades &
Ghouls (Outdoor Encounter, near Spiral Pit) - Get the
shades first.
Spiral
Pit, outer ring - This is the location of the Undead Curse quest. Do
not be fooled by the relative wimpiness of the undead in the outer
ring. They get exponentially worse the farther in you go. You can go
past the secret door (the northern one) as far as the first group of
ghouls, but the ghasts and the Shimmering Shade are probably more
than you want to deal with right now. And leave the Greater Shades
behind the other secret door alone too, until you have Ward of Elements.
Okay,
crunch time. Beatable fights are getting scarce (on Torment, anyway).
If you are
a masochist, you can roam around the honeycomb picking fights with
wandering bands of sliths. Or...take your boat down to the
great cave and score some easy XP to
get to level 12. Stick to the roads as much as possible and avoid
outdoor encounters for now. Stay away from the southwest corner of the
cave, near Ft. Remote - too dangerous.
You won't need to do anywhere near all of this to get to level 12, so
leave some of it for later if you want. And if you've been raising
Arcane Lore instead of waiting for Sage Lore, you already have access
to the Ward of Elements and Ward of Steel tomes; you can forget about
the Great Cave for now and skip ahead to most of the level 12 tasks.
Chevyn's Ring
(Castle, Chevyn) - Any platinum ring will do, but there's one in a
barrel near the cells.
Works of Magery
(Castle, Benth) - A collection quest.
Kelner's Note
(Almaria, job board)
The Serpent Ring
(Almaria, Dexter) - First visit one of the farms east of Almaria to get
the "password", or Dexter won't trust you.
Message - Cormac
(Almaria, job board) - Avoid the slimes for now.
Graymold Patch
(Ft. Emerald, Hodgson) - Assuming you've been there, you can turn this
in right away.
Message for Elizabeth
(Ft. Emerald, Matthias) - She's in Cotra.
Iron Bars
(Blosk, Jonnhalyn) - A collection quest.
Message - Shaynee
(Blosk, Leith)
Message - Bargha
(Dharmon, job board)
Vapor rats (Dharmon,
north entrance)
Cure Hathwisa (Patrick's
Tower, Patrick) - A juicy pile of XP for this one — it was worth saving
that graymold.
Graymold Recipe
(Patrick's Tower, Kai)
The Scimitar
(Various possible sources direct you to Calder in Bargha)
Bargha's Library
(ToM, X)
Valorim Bestiary, I
& II (Dharmon, Witch)
There's
more than enough there to get you comfortably to level 12. And if
you've been waiting to get Sage Lore, now you can go back to all of
those spell tomes. The extra spell levels will help your
survivability dramatically. If you've forgotten where the spells were,
there's a complete list here.
Level Twelve
By now you should have
at least two
levels of Steelward and one of Spellward (from the tome in the
Freehold). This opens up more options for you.
Thantria's Sentinel (Formello, underground)
Lava Bats (Outdoor
Encounter, west of Formello)
Fire Lizards (Lair
of Motrax)
Aranea
City (west of Spider Cave) - This is the location of the Rescue a
Spider quest. You can clear most of it, leaving only the northern
sections.
Anti-poison Brew
(Ft. Emerald, Hodgson)
Aranea Fangs
(Ft. Draco, Aife) - A collection quest. Drop one before speaking to her
or she'll take all of them. You need one for Hodgson.
Wandering
Sliths (Slith slave camps, southwest of Ft. Dranlon) - Best if you
have the third level of Ward of Steel. Do not attack the camps
themselves yet.
Scout the Sliths
(Cmdr Rosie, Ft. Dranlon) - This island fort is also the location of
The
Slith
Menace quest, however you should just do the
lower level for the time being, then pop upstairs, grab the papers and
go. It will be tough and full of surprises,
and require several trips. While you're there, be sure to take the
rowboat to the secret room and grab
the crystal shard.
Burning Fungi
(Outdoor Encounter,
south of Island Fort) - Beatable if you have the third levels of WoS
and Haste, and at least one high-Dex character to draw fire. And Mass
Cure and Group Heal.
Spiral
Pit (near Mertis) - You should be able to do the 4 Greater Shades, and
the Shimmering Shade etc. in the big cavern. Turning the wheel will
release 4 more Greater Shades, so you might want to wait until the
lights are back on. If you switch from
Ward of Elements to Ward of Steel, you can go deeper. The Stalking
Wights are tough but beatable if you go in prepared and don't let them
swarm you. You probably don't want to go deeper than that right now.
However, if it so happens that you've levelled up, switch back to WoE
and carry on.
Level Thirteen
Ghosts etc. (Spiral Pit, cont'd) - The cheap way to
beat this is to keep most of the party back in the narrow tunnel and
send one character (preferably hasted) to trigger the trap. Have that
one scamper
back, then let the ghosts etc. come to you. It's still hard, but not
ridiculously so. Keep going far enough to turn the lights back on. At
this point it is possible to go on and finish the dungeon, but it will
probably cost you all of your Return Life scrolls, so I recommend
coming back later.
Ogre Patrol (Outdoor
Encounter, near Tower of Magi)
Ogre
Cave (northwest of ToM) - This is the location of The Ogre Mage quest.
You can do everything except the mage without too much difficulty. The
giant will be hard to hit, but you can whittle him down. You will need
more magic resistance (and/or Health) before you can finish the quest,
so come back after you have more levels of Ward of Elements. If you
want to do the whole dungeon at once, do it at level 16 or 17.
Imps (Outdoor
Encounter, west of ToM)
Invading Giant
(Job board, Formello) - Slow is really useful against large groups of
heavy hitters.
Hidden
Aranea Lair (north of Ft. Dranlon, on west side of river) - For now you
can clear the Araneas and Arachnid Servitors from the outer ring of
tunnels.
Don't go into the center cave yet, but you can probably handle the
Aranea Seer in the secret room to the northwest, if you have a spare piercing crystal. Nice reward there.
Search all of the bodies in the cave — one of
them has a crystal shard.
Crystal Cave
(north of Cotra, hidden cave) - If you have the two shards from the
aranea lair and the slith island fort, you can easily get four more
without combat. Two are on islands south and southwest of Cotra, one is
in a building north of Ft. Dranlon (reachable by boat), and you can get
one from a drake in a cave somewhat inland from the west shore of the
lake (you have to give him three haunches of meat). Failing that, you
could try to beat one of the slith slave camps. It would be doable on Normal at this point, but dicey on Torment.
Slith Patrol
(Outdoor Encounter, across the river from Ft. Dranlon) -
Finally! You will need to use a speed scroll, and it might take several
tries. You could have gone into the dungeon before this, by sneaking
past them, but you would have risked getting trapped.
Dranlon's Vengeance
and Slith Tome
(Cmdr Rosie and Mairwen, Ft. Dranlon) - Not easy but very satisfying.
Bring energy potions and Return Life scrolls. Or head upriver to get
the spell first. Don't rush into anything.
Rescue a Spider
(Spider, Spider Cave) - This would of course be easier at a higher
level, and if you've been
doing most of this guide, you're at least level 14 by now anyway. But
it is possible
at level 13 — if the
following conditions apply:
- You have the Return Life spell.
- You have Ward of Elements at level 3 (you would have had to
buy two levels in Dharmon — not easy to get enough cash for that by
this time).
- You have lots of energy potions and several speed scrolls.
- You are willing to try it several times to figure out what
works best.
Failing that, it's a much more reasonable prospect at level 16, while
still challenging enough to be satisfying.
Spiders and Demons
and Imps, Oh My! (Aranea City, Northwest corner) -
The Araneas and Aranea Watchers shouldn't give you too much trouble, if
you're careful not to step anywhere near the magic circle until they're
dead. Prepare for a physical fight when you do.
Level Fourteen
Smash the Eggs!
(Swamp City) - This is a straightforward physical fight. You can
position your characters to limit the melee attacks, and you should
take out the flingers first. The chieftain is ridiculously hard to hit
on Torment, but once his buddies are dead he isn't much of a threat.
Just keep him away from your squishy characters and whittle him down.
Araneas and Cave
Widows (Outdoor Encounter, near Hidden Aranea Lair) -
The ones near the bodies. Might take a couple of tries if you get
unlucky.
Hidden Aranea Lair,
cont'd - You should be able to do the Aranea Seers,
etc. in the center of the cave. Hang back in the tunnel and you'll only
have to deal with a couple of them at a time. Don't go upstairs just
yet. Though actually, if you have the patience, you can exploit a bug
to kill the Aranea Queen now, because she won't go hostile no matter
what you do until you choose the "Attack" option in her dialogue.
Unfortunately, you will find her very hard to hit, and you can't target
a friendly with spells. So you have to stand there swinging at her for
a long time. Boring.
Crypt Demons
(Underground Fort, crypt) - These guys are tough but if
you get them to split their targets you should be okay.
Slith Slave Camps
(southwest of Ft. Dranlon) - They get progressively
harder; fortunately your allies are very durable. The last
two might take several tries; if you get frustrated, just come back
later. This is one of the places where it's very helpful to have a
high-Dex character. Meet Clair — not one of these guys has a better
than 7% chance of hitting her, but she keeps them nicely occupied while
she's busy sniping their friends:

The Slith Menace
(Cotra, Job Board) - Tassik-Schai and his entourage are actually not
much of a threat to you at this point, but the slimes will kill you.
How this fight is supposed to go is that you damage him, he summons
slimes, you kill the slimes, lather, rinse, repeat. If you want to
fight the slimes on Torment, you'd better come back later. On Normal
what I would
do is kill his entourage then get the whole party into the little room
behind the gate, kill him, then take on all the slimes as they come. On
Torment you just can't kill them fast enough before getting
overwhelmed. So instead, after wiping out the cronies, I withdrew the
whole party all the way back to the stairs before harming a scale
on Tassik-Schai's hide. It doesn't matter how many slimes he
summons while you beat
him up — they won't move as long as he's blocking the tunnel. When he
dies, end combat and skedaddle down the stairs (try
to get the lead PC close to the stairs before you end combat). If you
leave the fort altogether and then return, the slimes will be gone, so
you can loot at will.
The Undead Curse
(Mertis, Elmer) - You should be able to finish this now, especially if
you've got the Return Life spell. It's best to leave the spectral
commander for last, because he'll summon reinforcements every time you
do him serious damage. You can either take your time and kill those as
they appear, or try to kill the commander as quickly as possible.
There
is undoubtedly more that you could do, but this is more than enough to
get you to level 15. Go back and do anything you've missed, or make
your way west from the Tower of Magi. If you keep getting killed, go
somewhere else. Avernum holds many more challenges for you yet, and you
are now ready to face them.
Level Fifteen
Avernum is your oyster.
Go kick subterranean butt.
